
Welcome, aspiring aviators, to the foundational principles of aviation. As your Chief Flight Instructor, I am committed to equipping you with the knowledge and skills essential for safe and proficient flight. Among the critical instruments in your cockpit, the Attitude Indicator stands paramount. Often referred to as the Artificial Horizon, this gyroscopic instrument serves as your primary reference for discerning the aircraft’s orientation, especially when visual cues from the outside world are limited or absent.
Understanding the Attitude Indicator
The attitude indicator is a sophisticated gyroscopic device meticulously designed to provide a real-time, visual representation of your aircraft’s attitude relative to the Earth’s horizon. Its display fundamentally communicates two vital aspects of your aircraft’s spatial orientation:
- Pitch Attitude: This indicates whether the aircraft’s nose is elevated (nose high) or depressed (nose low) relative to the horizon.
- Bank Attitude: This shows the degree to which the wings are level, or if the aircraft is banking to the left or right.
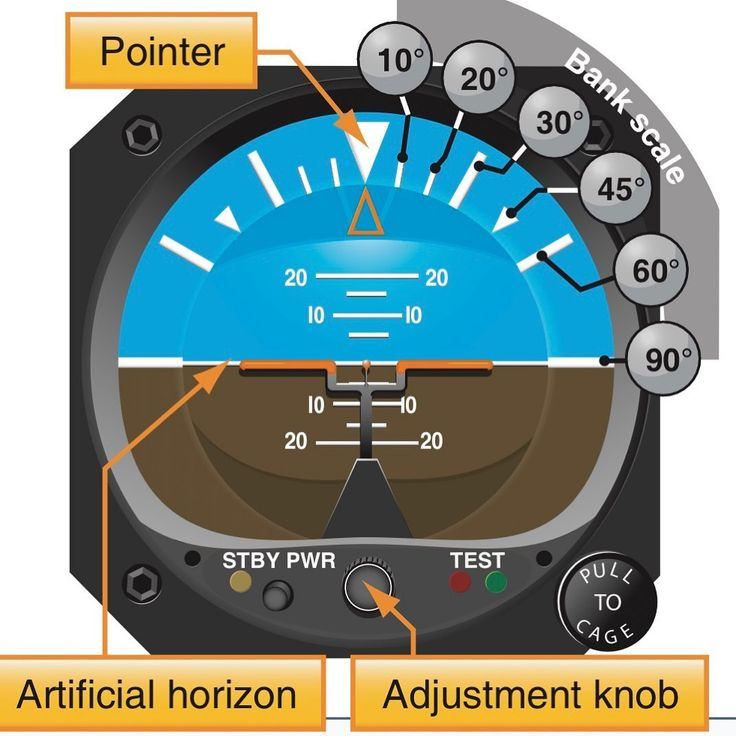
The instrument typically features a miniature aircraft symbol overlaid on a display divided into distinct sky (blue) and ground (brown/black) sections. The white line separating these sections precisely depicts the horizon. As the aircraft ascends, the miniature aircraft symbol moves upward relative to this horizon line; conversely, during a descent, it moves downward. Similarly, as the aircraft initiates a left or right bank, both the miniature aircraft and the horizon line will tilt commensurately. A calibrated scale at the top, typically marked in increments such as 10∘, 20∘, 30∘, etc., quantifies the bank angle, while horizontal lines above and below the miniature aircraft indicate pitch degrees.
The Indispensable Role of the Attitude Indicator
While visual flight rules (VFR) allow for reliance on external visual references in clear weather, the dynamics of flight fundamentally change when visibility becomes restricted. Encounters with clouds, fog, or night operations over unlit terrain can instantaneously eliminate a discernible natural horizon, leading to sensory deprivation and, crucially, spatial disorientation. This is precisely where the attitude indicator transitions from a helpful gauge to an indispensable tool for maintaining aircraft control.
As a core tenet of instrument flight, this instrument is the primary reference used when operating solely by instrument indications, devoid of external visual cues. Without the attitude indicator, spatial disorientation becomes an almost inevitable risk.
Spatial disorientation arises from conflicting sensory input—the eyes, inner ear (vestibular system), and proprioceptors (body position sensors)—sending contradictory signals to the brain. This can lead to erroneous perceptions, such as believing you are climbing when actually descending, or turning when flying straight. The attitude indicator, however, provides an unyielding and accurate reference, enabling precise control for straight and level flight, climbs, descents, and turns, even in zero-visibility conditions.
Operational Principles: How It Works
The precision of the attitude indicator is rooted in the principles of a gyroscope. A gyroscope, at its essence, is a rapidly spinning wheel or disk mounted in such a way that its axis of rotation remains fixed in space, irrespective of the movement of its supporting structure. This phenomenon, known as rigidity in space, ensures that the gyroscope maintains its orientation relative to an inertial frame of reference.
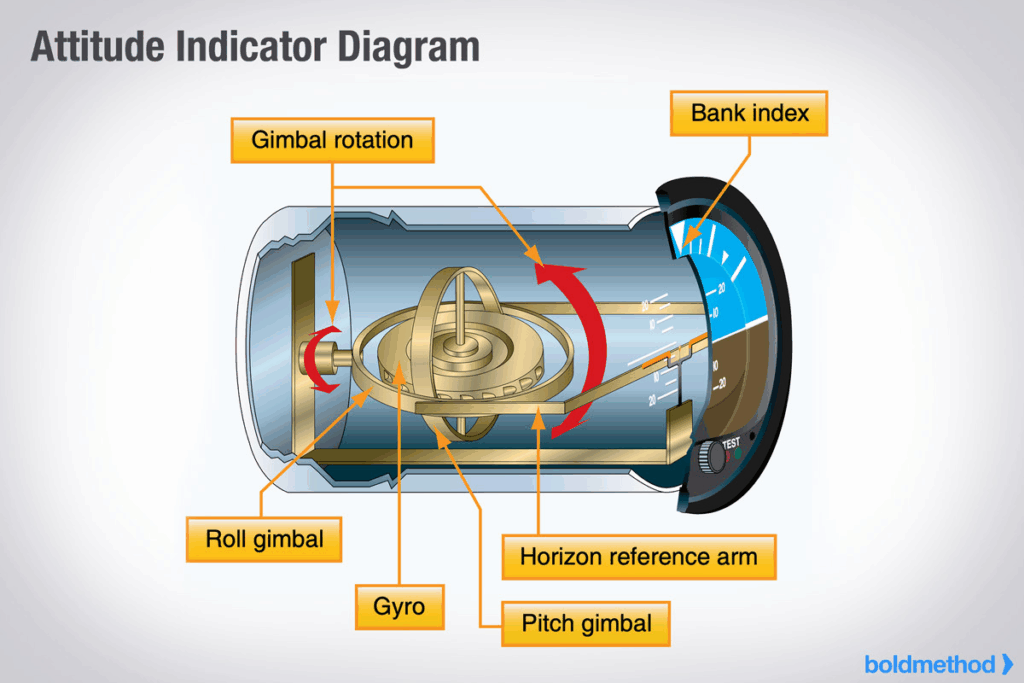
The gyroscope within the attitude indicator is typically driven by air (pneumatic) or electricity. It is precisely mounted so that its spin axis remains perpendicular to the Earth’s surface. As the aircraft pitches or banks, the instrument’s casing moves around this stable gyroscope, and this relative motion is mechanically or electronically translated into the visual depiction on the display. It’s worth noting that many contemporary aircraft now employ Attitude and Heading Reference Systems (AHRS). These advanced systems utilize solid-state gyroscopes and accelerometers to digitally compute and present attitude information, particularly in modern glass cockpits.
Professional Tips for New Pilots from Chief Flight Instructor Noura Gharib
Mastering the attitude indicator transcends mere recognition of its display; it demands the development of an intuitive and disciplined relationship with the instrument. Based on my experience as a Chief Flight Instructor, I offer the following professional insights to aid your proficiency:
- Systematic Instrument Scan: Avoid fixating on the attitude indicator. Instead, cultivate a continuous, fluid, and systematic scan across your entire instrument panel. While the attitude indicator is primary, it must be cross-referenced with the altimeter, airspeed indicator, vertical speed indicator, and heading indicator to formulate a comprehensive understanding of your aircraft’s performance.
- Establish the “Reference Picture”: Prior to flight, mentally establish the visual representation of level flight on your aircraft’s attitude indicator. Similarly, internalize what a standard bank angle (10∘, 20∘) or a typical climb/descent attitude looks like. This mental blueprint will serve as your immediate reference.
- Refined Control Inputs: When flying by instrument reference, resist the inclination towards large, abrupt control inputs. Precision is achieved through small, smooth, and timely corrections. Over-controlling is a common initial error that can be mitigated with disciplined practice.
- Target the Miniature Aircraft: Conceptually, view the miniature aircraft on the display as your target. Your objective is to consistently maintain it centered and aligned with the horizon bar for straight, unbanked flight. Intentional deviations for turns or changes in pitch should always be executed with purpose and precision.
- Dedicated Practice: Proficiency with the attitude indicator is cultivated through consistent, deliberate practice. During your flight training, I strongly recommend extensive periods of “under the hood” flying (utilizing a view-limiting device to restrict external vision). This simulated instrument flight is invaluable for developing the necessary skills. Begin with fundamental maneuvers such as straight and level flight, then progressively advance to controlled climbs, descents, and turns.
- Prioritize Instrument Data Over Sensation: This is arguably the most critical directive. In conditions of limited or absent visibility, your body’s sensory inputs can be profoundly misleading, as they are calibrated for a ground-based environment. If your physiological sensations conflict with the indications of the attitude indicator and other flight instruments, unconditionally trust your instruments. This discipline requires persistent practice but is fundamental to flight safety.
- Understand Instrument Limitations: While highly reliable, all instruments possess operational limits. Gyroscopic instruments can experience “tumble” or become inaccurate if subjected to excessive pitch or bank angles, or prolonged uncoordinated flight. Modern AHRS systems are considerably more robust, but pilots must always remain cognizant that no instrument is entirely infallible. Always cross-reference with other instruments that provide corroborating information.
- Utilize the Adjustment Knob: The adjustment knob, typically located at the bottom of the instrument, allows for the vertical alignment of the miniature aircraft with the horizon bar. This adjustment compensates for changes in aircraft pitch due to varying airspeeds or power settings, typically set to represent level cruise flight.
Cultivating Confidence Through Instrumentation
As you refine your ability to fly by reference to the attitude indicator, you are not merely acquiring a technical skill; you are fostering a deep trust in advanced technology and, more significantly, in your own capacity to accurately interpret data and respond effectively under demanding conditions. There will be moments when the external environment is an indistinct blur, yet within the cockpit, the attitude indicator will serve as your steadfast anchor, precisely revealing your position within the expansive sky.
Embrace this challenge. Grasp the underlying principles. Practice with unwavering dedication. The attitude indicator is far more than a mere component; it is your silent, steadfast partner, empowering you to navigate through diverse meteorological conditions and reach your destination securely. As a Chief Flight Instructor, I can attest that mastering instrument flight is among the most gratifying achievements in a pilot’s journey, unlocking unparalleled freedom and capability in the aerospace domain.
Go forth with confidence, meticulously hone your skills, and allow the attitude indicator to guide your trajectory. The horizon beckons, whether perceived visually or through the faithful representation on your instrument panel.
Quiz Your Attitude Indicator Skills!


- The Attitude Indicator - August 15, 2025